博文

目前显示的是 2019的博文

Why does wp-admin login page failed after changing to https because of looping redirection and how to solve it?

After changing my Wordpress from http to https, the wp-admin login page failed because of too many redirections. I finally solved this problem by adding the following line to wp-config.php: $_SERVER['HTTPS'] = 'on';
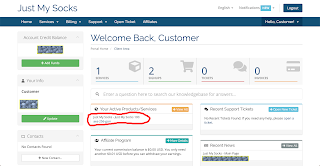
如何使用Just My Socks 快速设置Shadowsocks科学上网(Mac版为例,其他系统类似)(SSR/SS)

图片
准备工作: 下载Shadowsocks客户端,请参见: https://geekwagner.blogspot.com/2019/02/shadowsocks-clients-ss-for_28.html (下载ShadowsocksX-NG.app.x.x.x.zip就行,x.x.x是版本号) 注册Just My Socks账号: 点此进入 Step 1: 解压 解压下载好的ShadowsocksX-NG.app.x.x.x.zip,会得到一个名为ShadowsocksX-NG.app的应用(小飞机的图标),将它复制到你的Mac的应用程序下,便可以在launchpad中找到,方便日后使用。 Step 2: 隐私设置( 非Mac系统不需要此步骤 ) 为顺利打开小飞机,我们需要将在“系统偏好设置”>“安全性与隐私”中,将“允许从以下位置下载的应用”设置为“任何来源”。 点击小锁头,选中“任何来源”。如果“安全性与隐私”设置中找不到“任何来源”这一项,则请进行如下设置: 1. 打开“终端”; 2. 输入命令 sudo spctl --master-disable 回车后输入你的mac密码,注意输入密码时屏幕不会有显示,输入完毕回车即可,如果没有提示错误,则说明成功。 3. 重新打开“安全性与隐私”,此时已经可以看到“任何来源”。点击小锁头,输入密码后,选择“任何来源”,然后返回。 Step 3: 打开ShadowsocksX-NG 双击小飞机,打开ShadowsocksX-NG。 便可以在右上角看到一个小飞机,说明成功安装。 Step 4: 注册Just My Socks 点此注册 进入Just My Socks官网,点击右上角“Register”或者“注册”,依照提示注册。注册完成后,在菜单栏中点击“Store”>“Browse all”,购买合适的套餐。 建议购买2.88刀每月的套餐,只要不乱看视频乱下载,肯定是足足的够用。建议月付,防止因为不可名状的原因造成太大损失。 Step 5: 获取服务器信息 登陆Just My Socks网站,点击菜单里的“Home”或者“首页”,选择右边页面中的“Your Active Products/Services”中刚刚购买的套

[WP Plugin] Geek Mail Whitelist

图片
WordPress sites administrators often encounter a problem - zombie or fake users register to your site using fake Emails. The emails they use often strictly follow the Email format so it's hard for our program to judge if they are valid or not. Although we can prevent these users from really using our sites by sending activation Email, still they are a waste of database space and make it harder to manage members. As a result, an Email whitelist is needed to filter these annoying registrations. Geek Mail Whitelist is a plugin which can allow users with certain emails to register to your WordPress site by adding whitelist rules. What's more, it supports regular expression rules which makes it more powerful to fit all kinds of situations. And it is COMPLETELY FREE! Github page: https://github.com/gongwan33/geek-mail-whitelist Description - Allow certain kinds of users to register to your WordPress site by adding mail whitelist rules. - Super simple to use

[WP Plugin] Geek Mail Blacklist

图片
WordPress sites administrators often encounter a problem - zombie or fake users register to your site using fake Emails. The emails they use often strictly follow the Email format so it's hard for our program to judge if they are valid or not. Although we can prevent these users from really using our sites by sending activation Email, still they are a waste of database space and make it harder to manage members. As a result, an Email blacklist is needed to filter these annoying registrations. Geek Mail Blacklist is a plugin which can block users with certain emails from registering to your WordPress site by adding blacklist rules. What's more, it supports regular expression rules which makes it more powerful to fit all kinds of situations. And it is COMPLETELY FREE! Github page: https://github.com/gongwan33/geek-Mail-Blacklist WordPress Official page:  https://wordpress.org/plugins/geek-mail-blacklist/ Description - Block certain kinds of users from re

[Chrome] An ugly box appears when mouse hovers over a round bordered div

图片
As the picture shows, a small square showed on every rounded div element after hover or click event in Chrome but not in Safari. To solve this strange problem, I did some search and found the solution - add the following lines to the related css code: -webkit-backface-visibility: hidden; -moz-backface-visibility: hidden;

How to npm install jquery-ui and import it as a ESM?

We can use jquery-ui-bundle: npm install jquery-ui-bundle --save Then import: import 'jquery-ui-bundle'; import 'jquery-ui-bundle/jquery-ui.css';

Use pug with Vue

A usable webpack configuration for pug with Vue: {     test: /\.pug$/,     oneOf: [                   {                       resourceQuery: /^\?vue/,                       use: [                           'pug-plain-loader'                       ]                   },                   {                       use: [                           'raw-loader',                           'pug-plain-loader'                       ]                   }              ] }, Versions: "pug": "^2.0.3", "raw-loader": "^2.0.0",  "pug-plain-loader": "^1.0.0",  "vue-loader": "^15.7.0",   "vue-style-loader": "^4.1.2",   "vue-template-compiler": "^2.6.10",   "webpack": "^4.29.6",   "webpack-cli": "^3.3.0"

Start your old mobile without battery

图片
I think most of us have one or a few old mobiles which may lie in a corner without being touched for a long time. Most of those mobiles can still work but their batteries may be dead. Some of the mobiles can be turned on without batteries but some can not especially for those smart phones. Because they will check for a valid battery before properly start up. I found an old HUAWEI PLK-AL10 from my drawer and wanted to transform it into an alarm clock. But the problem was the battery had been completely dead. I had to do some modifications to fake a batter signal to make the board believe there is a healthy battery there and rely on the micro-usb power to start up. I took the mobile apart and got the battery with which I used a multimeter to test all the pads of its connector. Here is the definition of each pad. To fake battery signal I need at least two things: 1. Add a 10K resistor between temperature sensor pad and '-' pad. Or I take apart the battery and get the protec

ubuntu18.04 mysql5.7/mariadb10.1 set root password

1. Login (use sudo to login without password) sudo mysql -u root 2. Check SELECT User,Host FROM mysql.user; 3. Delete out root user DROP USER 'root'@'localhost'; 4. Create new root user CREATE USER 'root'@'%' IDENTIFIED BY 'your_password'; 5. Grant permissions GRANT ALL PRIVILEGES ON *.* TO 'root'@'%' WITH GRANT OPTION; 6. FLUSH PRIVILEGES;

Shell Symbols

$# csh, sh Number of arguments to script $* csh, sh Arguments to script $@ sh Original arguments to script $- sh Flags  passed to shell ${array[@]} leads to each element of the array being treated as a separate shell-word ${array[*]} results in a single shell-word with all of the elements of the array separated by spaces (or whatever the first character of IFS is) Difference between $@ and $* $@ ./test_shell "w1 w2" w3 w4 $@ will be w1 w2 w3 w4 $* ./test_shell "w1 w2" w3 w4 $* will be w1 w2 w3 w4

OpenWRT opkg install error: Cannot satisfy dependencies

After flashing the local compiled image to my route, I got this error when using opkg install sometimes: * satisfy_dependencies_for: Cannot satisfy the following dependencies for iptables-mod-tproxy: * kernel (= 4.9.152-1-0b692028eb19a63deb9c9d19c9fee83c) * opkg_install_cmd: Cannot install package iptables-mod-tproxy. Here is how the OpenWRT official site says: You will get the message  “Cannot satisfy the following dependencies for…” if the kernel version installed on your device does not match the kernel version required by the package you want to install. This happens very easily when you are using a snapshot image. Try to install via opkg with option  --force-depends  (=Install/remove despite failed dependencies). Mind that this is likely to fail for kernel related packages (kmods). Make local copy of snapshot packages (not recommended, needs much space!) if you are using a snapshot image, and the snapshot packages are missing in current builds. Wait

About Netgear WNDR4300v1 5GHz missing problem

After flashing OpenWRT to Netgear WNDR4300v1, I surprisingly found that 5GHz wireless card was missing. And I tried to flash back to OEM version but ended up in dead loop rebooting. The 5GHz wifi of WNDR4300 is provided by AR9580 which is connected by the PCI interface. I used dmesg to inspect the log of openwrt and found that PCI found nothing when starting. Was the chip broken? I nearly gave up and tried to disconnect the router with its power and went to dinner. After the dinner, I powered up the router and -- it just worked! Here is the log from dmesg. [     0.391671] PCI host bridge to bus 0000:00 [     0.396044] pci_bus 0000:00: root bus resource [mem 0x10000000-0x13ffffff] [     0.403409] pci_bus 0000:00: root bus resource [io   0x0000] [     0.409340] pci_bus 0000:00: root bus resource [??? 0x00000000 flags 0x0] [     0.416575] pci_bus 0000:00: No busn resource found for root bus, will use [bus 00-ff] [     0.425036] pci 0000:00:00.0: [168c:0033] type 00 cl

Compile specific OpenWRT version and change the mtdlayout

1. Clone OpenWRT project from github git clone https://github.com/openwrt/openwrt.git 2. Find the release info from their github page. Click the 'X releases' tab can copy the commit number of the release you want. 3. Enter the folder of your cloned openwrt and reset header to that release. git reset --hard <commit number> 4. Install feeds. ./scripts/feeds update -a ./scripts/feeds install -a 5. Config. You must choose your target according to your router. make menuconfig e.g.: For router Netgear WNDR4300 * Target System => Atheros AR7xxx/AR9xxx * Subtarget  => Generic devices with nand flash * Target Profile => Netgear WNDR4300v1 * You may need LuCi Web admin interface. Please choose LuCi/Collections/luci 6. Download all packages before make make download 7. Make. (If you are in China, you may encounter some errors caused by GFW. Try to use a proxy to solve the problem.) make 8. The image will be in ./bin/targets/<your

Use Nmap to Scan Ports (cheat sheet)

1.Basic scan nmap 41.22.10.1 nmap yourdomain.com 2.Scan specific ports nmap -p 1-65535 41.22.10.1 nmap -p 1,443 41.22.10.1 3.Scan multipul ips nmap 1.1.1.1 1.1.1.2 nmap 1.1.1.1,2,3,4 (This will scan 1.1.1.1 1.1.1.2 1.1.1.3 1.1.1.4) nmap 1.1.1.1-4 nmap 1.1.1.* nmap 1.1.1.0/28 4.Scan popular ports nmap --top-ports 20 1.1.1.1 (Scan 20 ports of 1.1.1.1) 5.Scan target from a file nmap -iL list.txt 6.Scan an Service detection nmap -A -T4 1.1.1.1 (-A is for service detection. -T4 speeds up this operation) 7.Detect Service/Daemon nmap -sV 1.1.1.1 8.Scan using UDP/TCP nmap -sT 1.1.1.1 (For TCP) nmap -sU 1.1.1.1 (For UDP) 9.Vulnerability detection nmap -Pn --script vuln 1.1.1.1 10.Launch DOS Attack nmap 1.1.1.1 -max-parallelism 800 -Pn --script http-slowloris --script-args http-slowloris.runforever=true 11.Lauch brute force attacks nmap -sV --script http-wordpress-

Use IBM kubernetes

1. Install some related plugins. $ curl -sL https://ibm.biz/idt-installer | bash 2. Login to IBM Cloud Container Registry CLI $ ibmcloud cr login 3. Check the namespace in your registry. $ ibmcloud cr namespace-list 4. Build. $ ibmcloud cr build -t us.icr.io/<namespace>/hello-world:1 . 5. Run image. $ kubectl run hello-world-deployment --image=us.icr.io/<namespace>/hello-world:1 -- <your params> 6. Then you can login to your IBM Cloud control panel to check the status of your container. 7. Expose certain port. $ kubectl expose deployment/hello-world-deployment --type=NodePort --port=8080 --name=hello-world-service --target-port=8080 ------------------------------------------------------------ Other useful commands: 1. Get your current deployments. $ kubectl get deployments 2. Inspect the basic information of your deployment. $ kubectl describe deployments <your deployment's name> 3. Stop the deployment $ kubectl delete deployment

How to solve docker-deamon connection failed error after updating the kernel

Please make sure linux-image-extra-$(your version) is installed and that version is enabled as your active kernel.

Shadowsocks client (SS客户端/SSR客户端) for windows/mac/android/linux/ios

Shadowsocks 服务推荐: Just My Socks 推荐理由:价格便宜,支持月付,安全灵活。 Windows Latest:  https://github.com/shadowsocks/shadowsocks-windows/releases Local:  https://geekblog.mybluemix.net/wp-content/uploads/files/Shadowsocks-4.1.4-windows.zip Mac Latest:  https://github.com/shadowsocks/ShadowsocksX-NG/releases Local:  https://geekblog.mybluemix.net/wp-content/uploads/files/ShadowsocksX-NG.app.1.8.2.zip Android Latest:  https://github.com/shadowsocks/shadowsocks-android/releases Local:  https://geekblog.mybluemix.net/wp-content/uploads/files/shadowsocks-android.zip Linux Latest:  https://github.com/shadowsocks/shadowsocks-qt5/wiki/Installation IOS 可以通过AppStore使用收费版本SuperWingy, ShadowBroken 或者通过PP助手下载shadowrocket

Openwrt settings for ipv6

Environment: internet      | Netgear R6250      |                                                                                  | Netgear WNDR4300 (OpenWRT)                                        PCs      | PCs R6250 Configurations: Just put everything to auto and enable ipv6 in advanced settings of the web management page. WNDR4300 Configurations: Interface 'lan' : in ipv6 settings, set ra (Router Advertisement-Service) to 'relay', DHCPv6-Service to 'relay', NDP-proxy to 'hybrid' clear ULA-prefix in 'Interfaces' page modify /etc/config/dhcp: config dhcp 'wan' option interface 'wan' option ignore '1' NEW: option ra 'relay' NEW: option dhcpv6 'relay' NEW: option ndp 'relay' NEW: option master '1' reboot

Mysql create a remote user

my.cnf (my.ini on windows) # Replace xxx with your IP Address bind-address = xxx . xxx . xxx . xxx then CREATE USER 'myuser' @ 'localhost' IDENTIFIED BY 'mypass' ; CREATE USER 'myuser' @ '%' IDENTIFIED BY 'mypass' ; Then GRANT ALL ON *.* TO 'myuser' @ 'localhost' ; GRANT ALL ON *.* TO 'myuser' @ '%' ;

About IPv6

Stateful DHCPv6  auto-configuration of IPv6 is the equivalent of DHCP in IPv4. A DHCPv6 service provides the IPv6 address to the client device and both client and server maintain the "state" of that address (i.e. lease time, etc). The router in its router advertisement message will tell the newly come-up host to ask for all address (global address, DNS address, SIP proxy server address) from the DHCPv6 server. Stateless DHCPv6  is for the auto-configuration by the client device of its IPv6 address and routing based on the router advertisements. The router tells the newly come-up host to take only the extra information like DNS, SIP proxy server address from the DHCPv6 server, while the global address is given to the host by the prefix present in the router advertisement message. The router gives the prefix of 64 bits and the host uses its MAC address (48 bits) converted in  EUI-64  method to obtain a global IPv6 address. In detail, from the article  What is the differenc