博文

How to check whether Brew services are successfully started.

 'brew services start <service name>' sometimes will claim it 'successfully' started a service even though it didn't. And it won't give you any log. However, we can use the command 'brew services list' to find the coresponding plist file and manually execute the service start command in that file. By doing this, the error can be print out.  

Why does wp-admin login page failed after changing to https because of looping redirection and how to solve it?

After changing my Wordpress from http to https, the wp-admin login page failed because of too many redirections. I finally solved this problem by adding the following line to wp-config.php: $_SERVER['HTTPS'] = 'on';

如何使用Just My Socks 快速设置Shadowsocks科学上网(Mac版为例,其他系统类似)(SSR/SS)

图片
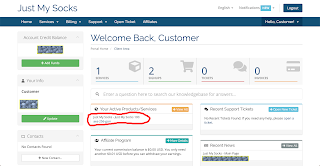
准备工作: 下载Shadowsocks客户端,请参见: https://geekwagner.blogspot.com/2019/02/shadowsocks-clients-ss-for_28.html (下载ShadowsocksX-NG.app.x.x.x.zip就行,x.x.x是版本号) 注册Just My Socks账号: 点此进入 Step 1: 解压 解压下载好的ShadowsocksX-NG.app.x.x.x.zip,会得到一个名为ShadowsocksX-NG.app的应用(小飞机的图标),将它复制到你的Mac的应用程序下,便可以在launchpad中找到,方便日后使用。 Step 2: 隐私设置( 非Mac系统不需要此步骤 ) 为顺利打开小飞机,我们需要将在“系统偏好设置”>“安全性与隐私”中,将“允许从以下位置下载的应用”设置为“任何来源”。 点击小锁头,选中“任何来源”。如果“安全性与隐私”设置中找不到“任何来源”这一项,则请进行如下设置: 1. 打开“终端”; 2. 输入命令 sudo spctl --master-disable 回车后输入你的mac密码,注意输入密码时屏幕不会有显示,输入完毕回车即可,如果没有提示错误,则说明成功。 3. 重新打开“安全性与隐私”,此时已经可以看到“任何来源”。点击小锁头,输入密码后,选择“任何来源”,然后返回。 Step 3: 打开ShadowsocksX-NG 双击小飞机,打开ShadowsocksX-NG。 便可以在右上角看到一个小飞机,说明成功安装。 Step 4: 注册Just My Socks 点此注册 进入Just My Socks官网,点击右上角“Register”或者“注册”,依照提示注册。注册完成后,在菜单栏中点击“Store”>“Browse all”,购买合适的套餐。 建议购买2.88刀每月的套餐,只要不乱看视频乱下载,肯定是足足的够用。建议月付,防止因为不可名状的原因造成太大损失。 Step 5: 获取服务器信息 登陆Just My Socks网站,点击菜单里的“Home”或者“首页”,选择右边页面中的“Your Active Products/Services”中刚刚购买的套

[WP Plugin] Geek Mail Whitelist

图片
WordPress sites administrators often encounter a problem - zombie or fake users register to your site using fake Emails. The emails they use often strictly follow the Email format so it's hard for our program to judge if they are valid or not. Although we can prevent these users from really using our sites by sending activation Email, still they are a waste of database space and make it harder to manage members. As a result, an Email whitelist is needed to filter these annoying registrations. Geek Mail Whitelist is a plugin which can allow users with certain emails to register to your WordPress site by adding whitelist rules. What's more, it supports regular expression rules which makes it more powerful to fit all kinds of situations. And it is COMPLETELY FREE! Github page: https://github.com/gongwan33/geek-mail-whitelist Description - Allow certain kinds of users to register to your WordPress site by adding mail whitelist rules. - Super simple to use

[WP Plugin] Geek Mail Blacklist

图片
WordPress sites administrators often encounter a problem - zombie or fake users register to your site using fake Emails. The emails they use often strictly follow the Email format so it's hard for our program to judge if they are valid or not. Although we can prevent these users from really using our sites by sending activation Email, still they are a waste of database space and make it harder to manage members. As a result, an Email blacklist is needed to filter these annoying registrations. Geek Mail Blacklist is a plugin which can block users with certain emails from registering to your WordPress site by adding blacklist rules. What's more, it supports regular expression rules which makes it more powerful to fit all kinds of situations. And it is COMPLETELY FREE! Github page: https://github.com/gongwan33/geek-Mail-Blacklist WordPress Official page:  https://wordpress.org/plugins/geek-mail-blacklist/ Description - Block certain kinds of users from re

[Chrome] An ugly box appears when mouse hovers over a round bordered div

图片
As the picture shows, a small square showed on every rounded div element after hover or click event in Chrome but not in Safari. To solve this strange problem, I did some search and found the solution - add the following lines to the related css code: -webkit-backface-visibility: hidden; -moz-backface-visibility: hidden;

How to npm install jquery-ui and import it as a ESM?

We can use jquery-ui-bundle: npm install jquery-ui-bundle --save Then import: import 'jquery-ui-bundle'; import 'jquery-ui-bundle/jquery-ui.css';